Tricentis Tosca 16.0 Released on Feb-2023 ----- UFT has been upgraded from UFT 15.0.1 to UFT One 15.0.2, Beginning at November 2020.

Monday, 18 July 2022

What does APO mean?

SAP APO stands for SAP Advanced Planning and Optimization and is the planning component within the mySAP SCM solution.

Can SAP APO be used as a stand-alone solution?

No, SAP APO always requires a backend ERP system for execution functions. In most cases, the backend system is an SAP R/3 system.

Can SAP APO and SAP R/3 be installed on the same server and use the same database?

No, SAP APO requires a separate server. The actual size of the SAP APO system may vary and depends on the data volume to be processed. 

How does SAP R/3 communicate with SAP APO?

Through the APO Core Interface (CIF) which supplies SAP APO with master and transaction data in real time. CIF is delivered through the R/3 Plug-In, which is something you have to install in your SAP R/3 system. This is the same Plug-In that you need for connecting a BW or a CRM system.

What about the exchange of data between the two systems?

With SAP APO you have a real-time integration to SAP R/3. The minute you change something in one system, it is immediately being transferred to the other and vice versa. And that goes for all data, be it a sales order, a production order or a purchase order. You do not have to perform any batch jobs for transferring data between the systems.

SAP APO is a separate system. Do I have to maintain the master data twice?

No. You create and change master data exclusively in SAP R/3. If you want to work with SAP APO, you need to transfer the master data from the SAP R/3 system. Depending on the scenario you want to use in SAP APO, you may have to enhance the transferred data with SAP APO specific settings, which are not relevant to SAP R/3.


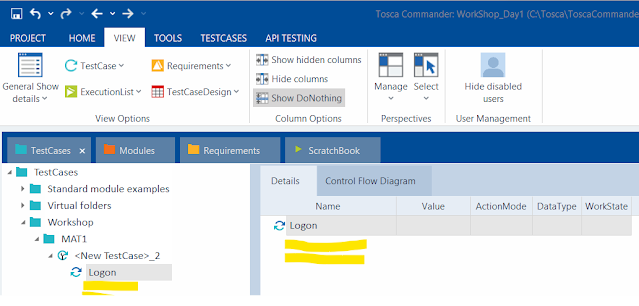
when I drag(call) it a module through the test case creation folder it is coming empty module. It is not showing module details.

Created a module in TOSCA with two test steps. However, when I drag(call) it through the test case creation folder it is coming empty module. It is not showing module details.


Ans - 

Select the the Test case folder and Click on F9

Or

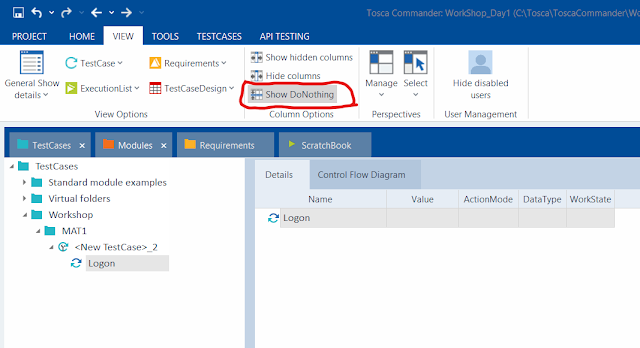
1. Click on the test case

2. Go to view tab in the ribbon and make sure you toggle Hide DoNothing or Show DoNothing.


Thursday, 14 July 2022

Self-Defined Test Configuration Parameter

Self-Defined Test Configuration Parameter - Centrally sets values to be used within test cases; it is maintained in the central location rather than in every occurrence.

Steps to use a Self-Defined Test Configuration Parameter. 

1. Create the parameter in the test configuration tab.

2. Enter its name and value

3. Use {CP[ParameterName]} to apply the value.


How to Use ActionMode WaitOn

WaitOn

WaitOn Delays the execution of the next TestStepValue by waiting for a specific property or value; the wait duration is dynamic.

The maximum duration fo WaitOn can be changed here:

Settings ---> TBox --> Synchronization ---> Synchronization TimeOut during WaitOn

Setting ActionMode as WaitOn

1. Enter a Property(e.g. InnerText) as the value of TestStepAtrribute

2. Enter the desired value (e.g. True)

3. Set ActionMode to WaitOn


Libraries

In which section of Tosca are libraries used

Ans - TestCase

What is a best pracice in order to use Reusable TestStepBlocks

Ans- For TestSteps or Sequences of TestSTeps that are needed more then once.

What limitation exists for the creating of Libraries in a Workspace ?

Ans - One Library per TestCase Folder.

How to Create Reusable TestStepBlocks

TestStep Library - TestStep Library contains Reusable TestStep Blocks; any changes in the Library will automatically update References in TestCases.

Reusable TestStepBlocks - One or More TestSteps that will be reused throughout numerous TestCases; Contained within a Library.

Creating Reusable TestStepBlocks
  1. Create a TestStep Library within a TestCase Folder
  2. Add TestSteps or TestStep Folders to the Library by creating them or dragging and dropping in existing ones. 
Drag a TestStepFolder containing a TestStep or a sequence of TestSteps onto a TestSTep Library and the Reusable TestSTepBlock will be created automatically

or 
Create a Reusable TestSTepBlock in the Library and drag Modules onto it in order to create a sequence.

or 
Create Reusable TestStepBlock in the Library and drag TestSteps onto it in order to create a sequence.

Buffer

Saves variable values from the SUT to a local buffer (variable storage).

How To Set a Buffer

1. Enter a Property(e.g.InnerText) and a Buffer name as the value of a TestStep Attribute.

2. Set ActionMode to Buffer

How to use a Set Buffer

1. Enter {B[<Buffername>]} as the Value of a TestStep Attribute.

2. Set ActionMode to Input or Verify.

NOTE - Stored Values can be viewed in the menu items: Project-->Settings--->Engine-->Buffer

How to Work With Tables

1. Select the table control to work with

2. Select for row or coloumn either a static value like, #1 or enter dynamic values lik, #{B[<Buffername>]}.

3. Select the cell and enter a value and the corresponding ActionMode for the task.

Wednesday, 13 July 2022

How to Use Dyname Dates

1. Choose the right Date Expression

2. Fill in the base date

3. Enter the desired offset

4. Enter the desired format

Dynamic Date Examples

{DATE[][][]}

{DATE[][][yyyy]}

{DATE[][+2M][MM]}

{DATE[03.23.2022][+3y][dd.MM.yy]}


How to Steer a Control

1. Locate the necessary control within a TestStep 

2. Enter the appropriate Value

3. Enter steeting instructions using ActionMode and DataType.

Tuesday, 12 July 2022

Identify Controls by Anchor in XScan

In Tricentis Tosca, you can use technical properties of controls to identify other controls. For example if you copy a textbox Label to the Textbox. In this case Tosca copies the identification criteria from the anchor control to the selected control.


To Identify controls by anchors, following are steps.

  1. Scan the required test object by using Tosca XScan.
  2. In the Advance View of Tosca XScan, click the Identify by button and select Anchor from the drop-down menu to open the Identify by Anchor window.
  3. Select the control which should be identified.

The system automatically searches for a possible anchor and picks a unique Anchor Control.

NOTE - Alternatively you can select an Anchor Control manually, eg. If the system cannot find an Acnhor Control

--> To manually select an Anchor Control, use drag and drop to move the control whose identification criteria should be copied to the Achor Control field. The control is shown in this field as soon as you release the mouse button.

NOTE - Alternatively, you can click on the Select on Screen button in the Identify by Anchor window and select the control that should be used as Anchor Control from your application.


The Anchor Control Properties window shows the properties that were transferred along with the control.

Relative Algorithm - 

In this drop-down menu you can define the algorithm to be used to identify controls by an anchor control. The selection is made automatically.

Possbile Values - 

Shortest Path - The system searches each tree level for the control to be identified, starting with the anchor control. The search starts directly beneath the control and goes from button to top to the root element.

Coordinate - The exact position of the control to be identified is searched by using coordinates.

Auto - If the Shortest Path algorithm was unsuccessful, the system will switch to the Coordinate algorithm.

Remove Anchors -  To remove an anchor, select the control used for identification in the Anchor Control window and select the option Remove Anchor from the context menu.

NOTE - To identifying the Anchor, you will use the UL element.

Identify controls by Properties

Indetifying controls by their properties is the default identification method in Tosca XScan.

The Identify by properties pane contains all the technical information and properties of the selected control. 

To load all technical properties for the selected control, click the More button and select Load all.


Make a control unique - If control is not uniquely identifiable, you can have Tricentis Tosca select the minimal number of additional properties from the Identify by properties pane to make it unique.

To do so, select the control and click Make Unique.


NOTE - Alternatively, you can manually select additional properties to identify the control or use a different identification method.

NOTE - The following properties are blacklisted: ActionPoint, ControlArea, ConstraintIndex, IsStreerable, XPath.

If Tricentis Tosca can't make the control unique with the minimal number of additional properties, a dialog appears that asks whether yoou want to consider all properties to make the control unique.

--> Click Yes to load all properties for the selected control to try to make it unique.

Define default ID's - You can define your own default ID's for a control in Tosca XScan so that Tosca XScan remembers them for the next scans. This way, you don't have to manually set the properties of a control to make it unique.

To define default ID's for a control, following are the steps:
  1. Select the control.
  2. In the Identify by properties pane, select the properties that you want to define as default IDs.
  3. Click More and select Define default ID.
Now that you have defined all default IDs for the control, they are saved to one of the following files in the directory -  %TRICENTIs_PROJECTS%\TOSCA_WORKSPACES\<Workspace name>\Settings:

  1. WorkspaceSettings.xml : per default, the default IDs are saved as workspace settings.
  2. ProjectSetttings.xml : If there are project settings defined for the repository and available to the current usery, the default IDs are saved as project settings.
NOTE - If you, for instance, work in a multi user workspace and want to make the settings in the "WorkspaceSettings.xml" file availabel to other users, you need to import the workspace settings to the project settings. To do so, following are the steps.
  1. Create a project settings root element if it doesn't exist already.
  2. Import the "WorkspaceSettings.xml" file into your project in Tosca.
The settings are available to all users and workspaces associated with the project.

you can also view all defaultIDs that you have defined in TOsca XScan in the Default setting located at Settings-->TBox-->XScan.

Reset Default IDs - To reset the default IDs that you defined, follwoign are the steps.
  1. Select the control.
  2. In the Identify by Properties pane, select the properties.
  3. Click More and select Reset defined default ID.

NOTE - Identification by properties is the most statble method and is completely independent of resolution or zoom settings.
It may, however, not be browser independent. 

In some cases, one browser defines the InnerText with all capital letters and one with normal notation. Because of this, you can deselect the InnerText and select InnerHtml.


Monday, 11 July 2022

Identify Controls In Tosca XScan

In Tosca Xscan, you can identify controls in your test application by using multiple identification methods. The identification of controls by their properties is the default identification method in Tosca XScan. However, if your controls cannot be identified uniquely by their controls, there are additional ways to identify controls.

You can identify controls in the following ways:

  1. Identify controls by properties
  2. Identify controls via Anchor
  3. Identify controls by index
  4. Identify controls via an image

XScan

Tricentis Tosca Xscan can scan various applications and it also supports almost all major technologies.

Where can we start the Xscan

In the Module sextion, right-click on the Module folder where you wish to create the Module and select Scan --- > Application.


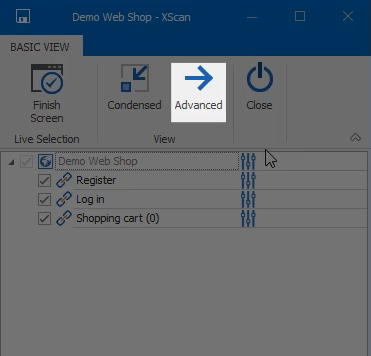
The Xscan window will by default open in the Basic view.


Advanced view - Which you can access by clicking on "Advanced"  In this view, you will have direct access to all the technical information and controls found in the SUT.


Select on Screen - The "Select on Screen" view allows you to click on controls directly in the browser. This is very similar to what the "Basic view" allows you to do,However, here you additionally see the available technical information of the entire page. 


Condensed View -Which you can access by clicking on "Condensed", In this view, the XScan window minimizes and pins itself to the right side of the screen, giving you full access to the SUT Page, where you can select the controls you need. 

The "Basic"button will send you back to the Basic view of XScan.


Finish Screen - The "Finish Screen" button will save your work as a module, in the Module section of Tosca.


Save Button - On the top left side of both Basic and Advanced views, you can find the "Save" button.

This button will save the current set of selected controls as a new Module in the Module section of Tosca. 


Finish Screen - The "Finish Screen" button will save and create a new Module.


The XScan will be reset to its starting position with no scanned controls. Once this is done, it will give you the option of scanning the SUT page agin.


Highlight on Screen - Lets suppose you are not sure which objects to select in your SUT. In this case, you can use the option "Highlight on screen".  The "Highlight on screen" option highlighs the controls selected in XScan in your SUT Page. 


This is the reverse of the "Select on Screen" method that we used before.

Sunday, 10 July 2022

Benefits Of Tosca

The following are some advanrages of using the Tosca test suite.

1. Tester can enjoy a script -free experience when testing various applications. There is no need to write scripts and since scripting is not required, people obviously use it more often and more effectively.

2. Copy paste functionality for test cases and modules and the possbility to reuse assets.

3. all-in-one toll with multiple features like support for model based and risk based approaches, automate both UI(User Interface) and non-UI applications, etc.

4. Able to cater to both small-scale and large-scale applications using Agile test methodology.

5. Provides support for most common technologies such as SAP(System application and Products), Oracle, Java, SOA, HTML and so on.

6. Available at a reasonable cost and provide a user friendly GUI(Graphical user interface).

7. As a result of its risk based and model based approach to test automation, Tosca simplifies end-to-end regression testing and reduces the time required for it.

Tosca TestSuite

It consists of four main componenets.

Tosca Commander - It is one of the essential parts of this tool for developing, managing and analysing test cases. It administers the test cases in the workspace.

Tosca Executor - The Tosca test executor executes test cases that have been developed on SUT (System Under Test).Commander is the middleware between the Test Repository and Tosca Executor, Which forwards test cases from the Test Repository to the Test Executor.

Tosca XScan(Tosca Wizard) - XScan scans input fields on the screen and saves them as modules for Tosca Commander. Technical information is included in these modules in order to identify and direct  screen elements.

Test Repository/Common Repository - This is where complete workspaces are stored like test objects, test cases, etc.. The test repository is necessary, In Order to work several or user tester at the same time. 

Features of Tricentis Tosca

Tosca has easy to use features make it popular with testers in the education, metal, mining and automative industries. Tosca has the following features.

  1. Script-less test automation is possible using the drag and drop feature of modules, which simplifies software development.
  2. Execution is fast and continuous testing is available to support DevOps.
  3. Supports risk based testing to suggest the best test cases and calculate the risk contributions of each test case.
  4. Supports Module-based test development where a model of the application under test(AUT) is created instead of scripts. A model cab be used to represent the intended behavior of an AUT, as well as the testing strategy and the test environment.
  5. Using Tosca, Business users can record their daily activities and then convert them into automated test cases, thereby elimination the need for manual tests.
  6. Imporve test stability and efficency with a codeless approach to API testing.
  7. Test scripts are faster and more effectively by running multiple tests simultaneously across distributed infrastructures and virtual machines.
  8. Maintenance effort is minimal.
  9. Possible to automate both UI(User Interface) and non-UI applications like XML, SOAP and mainframes ,etc.

Tosca_Interview Questions and Answers

  1. General interview questions
  2. What is TOSCA
  3. What is TOSCA API ?
  4. What is ARA ?
  5. Tosca Versions History
  6. Advantages Of Tosca
  7. FrameWorks
  8. Mobile testing possible in TOSCA ?
  9. What kinds of mobile apps are supported by Tosca ?
  10. Benefits of using Tosca as a Test Automation Tool. ?
  11. What is Model based Testing and Risk Based Testing approach in TOSCA
  12. What is Model based Testing in TOSCA
  13. Features Of Tosca
  14. Benefits Of Tosca
  15. Tosca TestSuite
  16. Licence Types in TOSCA
  17. How to Steer a Control
  18. How to Use Dynamic Dates
  19. Dynamic Date Examples
  20. What is the difference between CALC & MATH functions
  21. What is Buffer
  22. How To Set a Buffer
  23. How to use a Set Buffer
  24. Buffer in Tables
  25. How many types of Modules in Tosca
  26. How many types of Engines available in Tosca
  27. How to Create Reusable TestStepBlocks
  28. In which section of Tosca are libraries used
  29. What Object Identification method exists in TOSCA
  30. What is a best pracice in order to use Reusable TestStepBlocks
  31. What limitation exists for the creating of Libraries in a Workspace
  32. How to Use ActionMode WaitOn
  33. Synchronization In Tosca
  34. What is the purpose of ActionMode Constraint
  35. How to use a Self-Defined Test Configuration Parameter.
  36. when trying to drag(call) it a module into the test case creation folder, module is coming empty. It is not showing module details.
  37. What is the methodology that the Tosca tool is based on
  38. Define business parameters in Tosca
  39. Components of the Tosca Testsuite package
  40. What types of testing can be done with Tosca
  41. Looping statements in Tosca
  42. How to launch more than one browser in Tricentis TOSCA ?
  43. How to clear your Temporary Internet Cache Files ?
  44. How To Open Notepad
  45. Open Tricentis.com in Internet Explorer
  46. Difference between Single user Workspace and Multi user WorkSpace
  47. How to Identify Elements Using Properties ?
  48. How to close all opened Multiple instances and browser tabs before executing script in Tosca.
  49. What are Action modes available in TOSCA
  50. Explicit Name and Dynamic Id in TOSCA
  51. Difference Between TestMandates and TestEvents
  52. What is Unattended Execution in Tosca
  53. Risk based and Model based testing in Tosca
  54. What is Result Count ?
  55. Explain Test Data Management in TOSCA ?
  56. What is Tosca Server ?
  57. What is Tricentis Cloud ?
  58. What is difference between TOSCA & Selenium ?
  59. What type of Modules that exist in TOSCA
  60. What do you mean by Exploratory Testing ?
  61. What are string operations in TOSCA ?
  62. What is Test Case Design section in TOSCA ?
  63. What is Class in TOSCA ?
  64. What are Libraries in TOSCA ?
  65. What all Integration exist in TOSCA
  66. What is TOSCA CI ?
  67. What are templates in TOSCA 
  68. Features Of Rescan ?
  69. What do you mean by Instantiation in Testcase Section ?
  70. What is Scratch book in TOSCA ?
  71. What is Recovery Scenarios ?
  72. What are Clean Up scenarios ?
  73. What are Dynamic Expressions ?
  74. List Out few Dynamic ID's
  75. What is explicit name ?
  76. What is TC shell in TOSCA
  77. What is TCShell
  78. What is Risk Based Testing
  79. What do you mean by Synchronization in Tosca
  80. What is TQL
  81. What is difference between SUBPARTS and SUPERPARTS ?
  82. What does XL reference mean in TOSCA
  83. What is Aid pack Module in Tosca
  84. What Logs exists in TOSCA at Execution list level. ?
  85. What is DEX Server in TOSCA
  86. What do you mean by TOSCA Vision AI ?
  87. What is TDS ?
  88. What is Frequency class ?
  89. What is workspace file extensions ?
  90. Explain What is TOSCA ?
  91. Explain the types of Excel modules in TOSCA
  92. Features of TOSCA
  93. List out the main Components of TOSCA Test Suite.
  94. Different types of Error in TOSCA ?
  95. What is Execution List ?
  96. What is the Short Cut for Test Case Creation
  97. What different work states exists in TOSCA ?
  98. How to add Module to a test Step ?
  99. What diifferent Data Types exist in TOSCA ?
  100. What is TCP ?
  101. What are different Action Modes in TOSCA ?
  102. What is Select Action Mode used For ?
  103. What does Constraint Action Mode do ?
  104. What is Buffer in TOSCA ?
  105. What is Business Parameters ?
  106. Looping Statements in TOSCA
  107. Shortcut keys for Expand All and Collapse All ?
  108. How to take Screenshots in TOSCA ?
  109. Describes the steps involved in creating a mobile test case using TOSCA.
  110. Which type of testing are commonly used with TOSCA
  111. How Can you handle data-driven testing for mobile appa in TOSCA ?
  112. What are the different types of TOSCA Artifacts
  113. Explain the Concept of TOSCA's risk-based testing ?
  114. How does TOSCA facilitate Portability and Interoperability across Cloud platforms. ?
  115. What are some techniques for optimizing TOSCA test suite Execution performance ?
  116. How does TOSCA handle Integration Testing ?
  117. What are some strategies for using TOSCA to perform Regression Testing ?
  118. What is the difference between Reusable Component and Module ?
  119. What is the difference between TestCase Design(TCD) and the Test Data Service(TDS)
  120. What are all the Standard Modules available for Windows Operations in Tosca.
  121. What are all the Standard Modules available for Buffer Operations in Tosca.
  122. What are all the Standard Modules available for File Operations in Tosca.
  123. What are all the Standard Modules available for Folder Operations in Tosca.
  124. What are all the Standard Modules available for SAP in Tosca.
  125. What are all the Standard Modules available for EXCEL in Tosca.
  126. What are all the Standard Modules available for TDS in Tosca.
  127. What are the Components of TBox?
  128. What is Cardinality in Tosca
  129. What is Self-Healing Mode in Tosca
  130. What is Index, Notations or ResultCount in Tosca
  131. Describe the organizational units of testing procedures in Tricentis Tosca?
  132. What is Tosca WebAccess?
  133. Explain Tosca test configuration parameters?
  134. What Is Template? How To Create Template?
  135. What types of logs are available in Tosca?
  136. What are core Components of Tricentis Tosca
  137. Tosca Query Language
  138. How to find test cases with a specific name?
  139. How to find test cases containing a specific keyword in their description ?
  140. How to find test cases using the created date ?
  141. How to find test cases with a test configuration parameter. Searching for test cases using Chrome browser ?
  142. How to find all the failed test cases in the execution list ?


Click Operations

Click Operations should be used as value inputs for certain controls, they must be specified in curly brackets. Both the respective control and the used technology determine which click operations are possible. 

Click Operations in tables are to be handled in a different way.

Example - The NEXT button is clicked on.


Click Operations-
CLICK  - Clicks with the left mouse button.
DBCLICK - Couble click with the left mouse button.
RIGHTCLICK - Click with the right mouse button.
DBLRIGHTCLICK - Double click with the right mouse button.
SHIFTCLICK - Click with the left mouse button and Shift key pressed.
CTRLCLICK - Click with the left mouse button and Ctrl key pressed.
SELECT -  A Control is selected 
DRAG - A control is copied to the clipboard.
DROP - A Control is inserted from the clipboard, The operation can only be performed after a previously performed drag operation.

Example - Row 7 is right clicked.

Sunday, 3 July 2022

Action Modes

ActionModes are used to steer the object. They define how the value in the Value field should be applied for XTestStepValues in order to steer the control.

The ActionModes available to an XTestStepValue depend on the InterFaceType of the referenced XModule.

ActionModes perform reading or input operations on  a control. Reading operations read the property that is defined for a control. Input operations modify the defined property during test execution.

ActionModes for reading operations:

  1. WaitOn
  2. Select
  3. Verify
  4. Buffer
  5. Constraint

ActionModes for input operations:

  1. Input
  2. Insert

WaitOn

The WaitOn interrupts the execution of the TestCase until the indicated property has the specified value.  The system waits until the control value matches the value specified in the value column or until the contol has adopted the specified property. 

The wait time is defined by the Settings --- > Synchronization Timeout during Waiton. 

Example - Here the Restart button only becomes active when the progress bar reaches 100%


In this example the system waits until the value of the control Progressbar has reached 100%. The Restart button is clicked as soon as this value is reached. 


Buffer -

If inputvalues are needed more than once, they can be buffered using the ActionMode Buffer.

Values or control properties can be saved to a global variable buffer and read out at any point of the test execution.

Any existing or temporarily saved buffer values can be accessed via the Settings dialog at Settings-->Engine in the Buffer sections or on Commander window Tools menu --> Buffer. 

To Buffer a value in the settings dialog, a Buffer name and a Buffer value are required.

NOTE - Use Buffer in messages to save values.
Later, you can use these values as input or for verifications. Make sure to assign meaningful names to your buffer values, so you can find them again.


Example - In this example the value Automation Type is set as buffer name. 


NOTE - The value for the control Make is taken from the application and copied to the settings dialog as a buffer value for the buffer Automation Type.

Constraint -

The Acitionmode Constraint limits the search for  a superordinate node. You can limit the search until it renderss a single element.

NOTE -Use Constraint to restrict the search for a parent node.

If more than one element is found, you can also limit the number of results to only one element by entering #<n> in the superordinate node.

Example - In the following table a row, which has the attribute First name including the value Julia and the attribute Last name including the value Jones, is Searched for in the table. In the row which contains these values, the engine should verify whether the attribute Date of Birth including the value 9/26/1977.
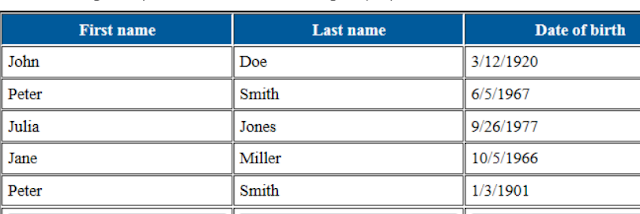
Example - In the table, the second row with attribute First name including the value Peter and the attribute Last name including the value Smith, is searched for. The Value #2 has to be entered for selecting the row. in this row, the engine should verify whether the attribute Date of birth has the value 1/3/1901.

Select

The ActionMode Select allows you to select specified nodes. The required node must have a unique name.

Example - Selecting and verifying the Yearly Amount.

In the table row Yearly Amount is selected. Then the system should verify whether the last cell of this row includes the value 1.207,56.


Verify

The ActionMode Verify allows values and control properties in test objects to be verified. Control properties are verified Value column of an XTestStepValue.

The target node must be specifically defined for this ActionMode to be executed. If no control property has been specified, the default property of the control is verified instead.

NOTE - The defined values are case-sensitive. The entire string is precisely verified. Regular Expressions can be used.

NOTE - You use this ActionMode to verify whether the value in a message matches the value in the Scenario. You can use literal and regular expressions.

Example - Verifies whether the value Truck over 1t(payload) is selected in the drop-down menu Type of Vehicle in the Tosca HTML sample application.


Input

The ActionMode Input can be used to transfer values to the test object. This can, for example, include the input of values into an Editbox, Clicking buttons or selecting a ComboBox, etc. 

If a ValueRange is specified in the ModuleAttribute of the linked XTestSTepValue, these values are provided for selection in the drop-down menu of the XTestStepValue. In addition, any user-specific values can be entered. 

Multi-line text is inputted via a forced line break using the key combination "Shift+Enter". The drop down menu must be converted into an edit box to be able to enter a multi-line value in a drop down menu. For this purpose, the key combination Ctrl+Shift+T must be applied to the selected XTestStepValue.

Example - In this example, Values are entered into the input fields of the TOSCA Sample application.

Insert  

The ActionMode Insert allows you to create objects in non-visual, non UI, interface environments.

Example - Adding a new entry to an XML file

In the following example, The ActionMode inset is used to write the new entry My new product to the XML file Products.